![]()
![]()
![]()
by Jim Nestor WK8G/2
This article comes in three parts, (1) what I built, (2) why I built it, and (3) VE7PCC's paddles built from my specs. I know you're impatient, but it probably makes sense to start with the why part. If not, just jump right to the details.
Over my 30 year ham career, I’ve done a lot of homebrewing. I’ve built everything from a 6 meter transverter to a computer-controlled switching system for VHF/UHF gear.
Once (and once was enough) I even rewound a power transformer. For about the last ten years, I have been exclusively a QRP CW guy and built lots of portable rigs for camping and traveling. But, I digress.
One of my proudest moments as a homebrew gear builder came when I was snowed in for a weekend. I built a vacuum tube (remember those?) and reed relay CW keyer without leaving the house. Everything from the aluminum for the chassis to all the pieces/parts to finish the job came from the junk box. It worked as advertised and I was really proud of my "Snowed-in Keyer". No more straight keys and glass elbows for me.
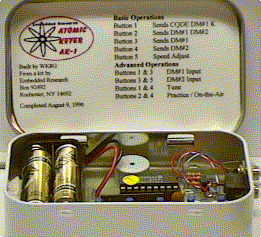
Since then, I’ve had dozens of keyers, the fanciest being a CMOS memory model from Logikey. I’ve also build a number of Curtis chip models, and recently a couple of PIC-based kits from Embeded Research, an Atomic keyer which I put in an Altoids box, and a Tick keyer which I built into a Wilderness 40A.

Tick keyer on back panel of Wilderness 40A.
Atomic keyer in an Altoids box.
The Tick keyer is about as small, functional, and inexpensive as possible. I’ll probably build one into all my homebrew rigs. So much for the keyers.
I’ve always had a problem finding suitable paddles. For that first homebrew keyer, I swapped with a friend for a chrome plated Vibroplex single lever paddle and thought I was in Heaven for awhile.
That was about the time that some troublemaker thought up the idea of using two levers and something called "iambic keying". Of course, neither my keyer circuit nor the Vibroplex couldn’t be "iambicized", so I started the quest for the perfect combination of keyer circuit and paddles.
Actually, I never did really master the Iambic keying thing. Instead, I still use sort of a sideswiping action (incurable case of Lake Erie Swing) with the dual lever apparatus. Nonetheless, I can cruise along at 25-30 words per minute without becoming fatigued. So, the bottom line is I am addicted to dual paddle iambic keying.
Over the years, I’ve owned lots of paddles including Benchers, MFJs, and Vibroplex Iambic and a German Schurr Wabbler.
*** insert picture of Schurr Wabbler
The Schurr is the smallest iambic paddle I’ve owned so far, and about one-half the size of the Vibroplex. It is a beautiful machine hand crafted from polished brass with a great feel. Almost perfect.
Although I paid a king’s ransom for it three years ago, it has actually appreciated in value. I tried to convince my XYL that we should invest in more "paddle futures" as part of our retirement planning, but she wouldn’t buy it. Guess I’ll have to make do with one Schurr for now.
I’ve carried the Schurr on camping trips and even on a journey to Australia. The problem is, it is still too big, too nice and too fragile for travel use. I’ve broken the Plexiglas paddles a couple of times and even cracked the Plexiglas cover on one trip. I hate to abuse a piece of fine machinery, so I finally decided that it deserves to stay on my operating table at home.
. Thus began the search for a suitable travel paddle. I decided that it must be very small to fit in a briefcase or backpack, have few adjustments that can jar out of adjustment, look nice, be reliable, and most importantly be inexpensive. In summary, it had to be: small, simple, cheap.
I figured that if it was small enough and cheap enough, I could take two with me on long camping trips in case one of them broke. There’s nothing worse than equipment failure when you’re sitting under a tree in the woods playing radio. I’ve done some interesting backwoods repair jobs, but that’s another story. Radio Shack doesn’t sell paddle parts.
I read all the catalogs and ham magazine advertisements and followed the postings on the Internet. It looked all over Europe and Asia/Pacific on business trips. No luck. Everything I found was too big, too expensive, or too flimsy for my specifications. Back to the old drawing board. In desperation, I decided to build one myself.
My Dad used to say, "When it comes to machinery, Jim’s a pretty good electrician". Although I’ve owned a small metal lathe and milling attachment, my machinist skills are limited to making a few brass drawer knobs. I could never aspire to the precision and quality of work in the Schurr paddles.
The question was, just how precise does a simple paddle have to be to be usable? Likewise, how adjustable does it have to be if I’m the only one using it? And finally, how small can it be and still be comfortable to use?
I collected some pieces of brass, a few nuts and bolts and some plastic and began to try to answer those questions.
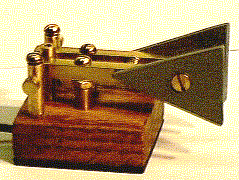
First, I "choked up" on the handles of the Schurr to see how long the paddle arms really needed to be and found that about 2 inches seemed OK. I cut a couple of pieces of 3/16" square brass to that length and laid them out on the bench.
Working around the paddle arms, I figured that the paddle base would have to be about 1-1/2" square to hold the pivots and contacts. I cut a scrap of ½" thick red oak to that size. That raised two more questions, what kind of bearings should I use to pivot the paddle arms, and how could I keep that tiny base from tipping over and sliding around on the table.
Following the KISS principle (Keep It Simple Stupid), I tried a number of pivot bearing schemes. The final result proved to be simple for effective. It consists of a pivot upright of 3/16" round brass rod topped by a 4.40 nut as a flat bearing surface. A 4.40 brass bolt goes through a smooth hole in the paddle arm and threads into the upright.
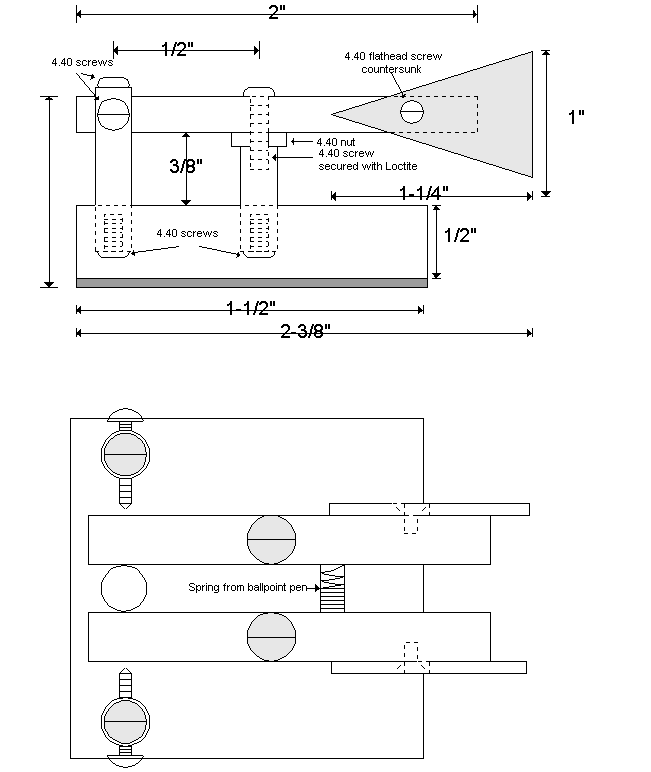
By carefully adjusting the bolt and nut, I was able to get a pretty smooth swiveling motion on the paddle arm, but the bolt still wobbled about in the 4.40 thread. A tiny drop of LocTite solved that problem. The mechanical details are shown in the measured drawings which are much larger than full-size.
The small size of the base was a tougher nut to crack. Traditionally, paddle bases are made large and heavy to solve the wobbling/sliding problem. I didn’t want either size or weight, so another approach was called for. I remembered some QRP-L postings about using non-skid materials to stop sliding. I tried using Velcro to stick the paddles to the table with some success, then I found the ultimate solution at the office supply store.
I bought a package of "business card magnets" which consisted of a thin rubberized magnetic surface on one side and "stickum" on the other. They are designed to hold business cards to file cabinets and grandchildren’s pictures to the refrigerator. The material can be cut with regular scissors.
I had successfully used a strip of this material on the bottom of the Atomic Keyer’s Altoids box to hold it to the top of the mobile rig. so cut a piece to fit the paddles oak base. Sure enough, it would stick nicely to anything made of steel.
I tried sticking the paddles to the top of the mobile rig, but that wasn’t a comfortable keying position. Neither could I use them hanging from the refrigerator.
I attached another magnetic strip to a small computer mouse pad. Success! The two magnets clung tightly enough to minimize wobble and the mouse pad stayed put on the desktop.
Buoyed by that discovery, I moved ahead to finish the prototype.
To keep things simple, all of the brass paddle pieces were made from 3/16" square bar and 3/16" rod. They were cut with a hacksaw in a miter box, drilled with a drill press, and finished with fine sand paper and steel wool to a reasonable shine.
The oak base was carved out a bit on the bottom to leave room for the cable connections. The uprights for the pivots and contacts were drilled through and tapped with a 4 . 40 thread, then secured in the holes with epoxy.
Paddle tension is provided by a piece of brass spring salvaged from a ball-point pen. It isn’t adjustable, but the feel is "just about right". Because of the small size and magnet base, a light two-finger keying style is recommended.
The contact screws were hand-filed to a point to minimize resistance. The Bencher style paddles were cut from plastic and secured with countersunk 4.40 flathead screws.
I must admit that I’m as proud of these tiny paddles as anything I’ve ever built. While they don’t compete with the Schurr in terms of precision and appearance, they do the job intended. For travel purposes, the paddles and cable, a set of Walkthing earbuds, and a small screwdriver all fit into a 4" x 2" x 1-1/2" project box.
The total cost for materials was about $5. Of course, the labor was free. I never did use the lathe. A drill press is probably essential to get the holes straight. A hacksaw and tap wrench rounds out the tool requirements.
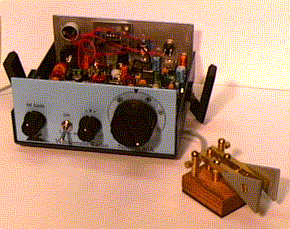
This article wasn’t intended as a complete "how to" with step-by-step directions. Likewise, the drawings are a bit rough and the dimensions approximate. Rather, it chronicles one ham’s quest and maybe it will motivate others to experiment and refine the design. If you take your time measuring, cutting and drilling, you too can build a FB set of paddles. Here's a picture of the paddles with a Wilderness 40A QRP transceiver. As a point of reference, the 40A is about 4-12" wide and 2" high.
Of course, I am now hooked on paddle-making. I need a second set as spares for camping, I want an all-brass model for show and tell, and maybe a fancy one with a rosewood base. Then there’s the question of the perfect size and shape and material for the finger pieces. And maybe a thin piece of steel would work better than the mouse pad.
I'm already working on the next model, and I'll be sure to post the results here. If you decide to make your own QRPpaddles, be sure to send me a picture.
![]()
![]()
![]()
![]()